|
|
|
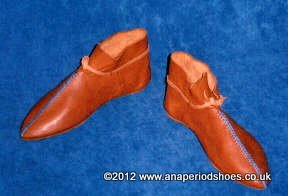
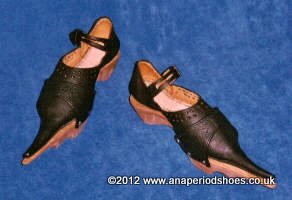
Shoes to Order: Prehistoric | Roman | Early Medieval Dark Age | High Medieval | Late Medieval | Tudor | How to Order |
||

TAKING THE MEASUREMENTS
Is this really necessary?
YES |
YES |
NO |
||
If you are ordering fully hand-stitched shoes |
If you are ordering any type of footwear from outside the UK |
If you are ordering machine-stitched shoes |
||
Because many of my styles fit very closely around instep and/or ankle. They are often without any fastenings in that region and for a good fit I do need full foot measurements from you. Made to measure is what you are paying for after all, so yes, I do need those measurements in order to do a good job. |
Because the actual fit of standard sizes varies between manufacturers and the cost of international postage for returns and exchanges is substantial. Plus the added inconvenience and the disappointment if the replacement arrives a few days after that special event. |
HOWEVER the fit of standard sizes varies between manufacturers and I cannot guarantee a good fit without foot measurements. |
Can I email you scans of the foot drawings?
Yes you can.
Provided you jump through the following additional hoops:
1.) Use A4 paper and ensure that the foot is placed on it diagonally to maximize the blank edges of paper around it.
Most scanners and printers "cut off" a margin of 1/2" around the edges of the paper, remember to keep those areas clear
2.) Draw two lines across the centre of the paper, right across the foot drawing. One line horizontally, one vertically.
Both lines must be exactly 10 centimetres long (Note: 10 centimetres are NOT 4 inches).
Emailed scans change size and I can then measure these lines and restore the images to their original size at my end.
3.) Send these scans using a file format that is universally recognised: jpg, gif or pdf are fine.
Now, lets go and measure some feet:
You MUST get someone else to take your measurements for you.
Your foot is in the resting position a full shoe size smaller than when weight-bearing. This iswhy you cannot simply put one foot on a small table and draw around it. Standing on both feet and bending down to measure means that you have to shift your weight and will also result in the wrong measurements, so please do not attemptthis either.
You will need:
these instructions
a print of the orderform
a very sharp pencil
a friend to measureyou
a flat surface tostand on
a large piece ofpaper
a tape measure
Step 1: Please wearthe socks you intend to wear with the shoes when you are beingmeasured. For boots please also wear any leg-coverings that will later be worn inside the boots.
Orthopaedic insoles: Historic footwear is not firm enough to support these. They will damage the heels of the machine-stitched footwear and you will just have to wear these shoes/boots without them. The same goes for the hand-stitched range. However, some styles of the hand-stitched range can be adjusted to the use of orthopaedic insoles, but you MUST get in touch with me before measuring and ordering to talk through the possibilities, the additional cost and how all this affects your warranty.
Step2: Put a piece of paper onthe floor and step onto it.Stand straight with your body weight equally distributed on both feet. If you do it correctly there is no need to lift your foot completely off the paper until all the measurements have been taken.
Step 3: Draw an outline of the foot. Use a sharp pencil or biro that makes a fine line. Take care to hold the pen at a slight angle away from your foot to compensate for the width of the pencil - like in the picture - to get an accurate outline that is neither bigger nor smaller than your foot. Make sure you are drawing an accurate outline all the way round, and avoid leaning under the foot especially at the back of the heel.
Step 4: Draw another outline around your foot, but this time angling the pen in as much as you can (unlike in the picture above), thus reaching under the foot as far as possible (this gives us useful information, like whether you have fallen arches etc.). It would be helpful if you used a different colour pencil for this second outline.
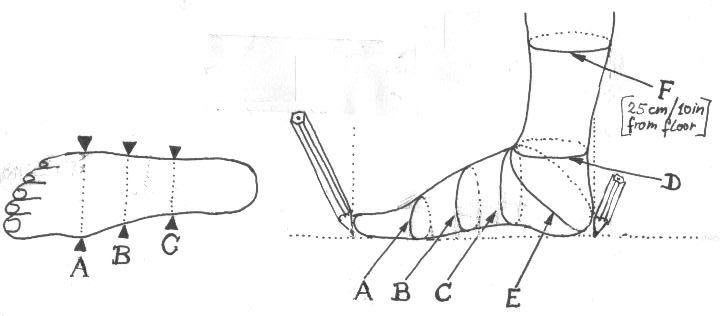
Step 5: Keep the foot in the original position on the paperfor all the following measurements with the tape measure and mark with notches onthe outline of the foot where exactly measurements A, B, and C were taken. Please remember to make these marks as they are vital for us.
To take measurements A, B and Cyou need to lift your foot slightly and partly off the paper to allow the measuring tape to slide under the foot. Then measure all the way round with the tape encircling your foot snugly. You can also include additional information e.g. the location of painful areas on the form.
Accuracy: Measure to the nearest millimetre, or if you prefer inches, to the nearest 1/16 of an inch. Don't worry if the measurements differ between your two feet, that is normal.
A :across the joint of the foot where it is widest
B : halfway between joint and ankle
C: across the instep where it is highest
D:around the ankle just under the anklebones where it is thinnest
E:diagonal from the heel to the top of the instep, where you get the smallest measurement for this position. You have to nudge the tape slightly under the heel for this
F: 25cm (10in) up from the ground around your calf (only for calf-highboots)
Step 6: Put your name and address onto the pieces of paper with your foot outlines, complete the order form, enclose the payment and send it via ordinary mail to the address on the order form. If ordering more than one pair of shoes at a time, please staple the order-forms to the drawings they belong to as this will avoid misunderstandings.
» OrderForm
» Payment
» Terms + Conditions
» Ordering
» Contact Us
» » Home
© Ana Deissler 09-2012